In my journey to deepen my cloud and DevOps skills, I set out to build a project using AWS. Leveraging S3 for storage, RDS for database management, EKS for deploying containerized apps, and the AWS CLI for automation, I created a cloud-native setup that showcases practical skills in AWS. This blog covers the setup process, key decisions, and lessons learned—ideal for anyone looking to explore cloud-based project development with AWS.
Project Goals and Objectives
The goal of this project was to create a cloud-based portfolio using AWS, showcasing practical skills in managing and automating cloud infrastructure. Each AWS service was chosen with a purpose:
- S3 for scalable file storage.
- RDS for relational data management.
- EKS for deploying and managing containerized applications.
- AWS CLI for efficient setup and resource management.
This setup provided hands-on experience with core cloud services, reinforcing skills in cloud architecture and automation.
Project Breakdown
1. AWS CLI Configuration and S3 Setup
To streamline management, I configured the AWS CLI using aws configure and created an S3 bucket to store project files:
aws s3 mb s3://my-portfolio-bucket --region ap-southeast-1
This allowed for easy file uploads and organized storage.
- 1. Setting Up the AWS CLI
- Installation: The AWS CLI was downloaded and installed on our system to allow command-line interactions with AWS services.
- Configuration:
- Using
aws configure, we set up the CLI with your Access Key ID, Secret Access Key, and default region (e.g.,ap-southeast-1). - After configuration, we verified the settings with
aws configure listto ensure the CLI was correctly set up for our AWS account.
- Using
- 2. Configuring IAM and Creating a User
- IAM User Creation:
- In the AWS Management Console, we accessed IAM by navigating to the IAM Console and created an IAM user named Stasy. This user was created to avoid using root access for security purposes, which is recommended by AWS best practices.
- Setting Up Access Keys:
- For programmatic access through the CLI, we generated an Access Key ID and Secret Access Key for the Stasy user.
- We configured the AWS CLI to use these credentials, allowing secure command-line access under the Stasy user.
- Assigning Permissions:
- The Stasy user initially had no permissions, so we added the AmazonS3FullAccess policy to allow interaction with S3.
- Additional policies, such as AmazonRDSFullAccess, were added as needed to enable the Stasy user to manage resources securely without root credentials.
- IAM User Creation:
- 3. Working with S3
- Creating an S3 Bucket:
- To store files and demonstrate S3 functionality, we created a bucket using the command:
aws s3 mb s3://my-test-bucket-stasy-20241104 --region ap-southeast-1 - Since S3 bucket names are globally unique, we ensured the bucket name was unique by adding custom identifiers.
- To store files and demonstrate S3 functionality, we created a bucket using the command:
- Verifying and Listing Buckets:
- After creating the bucket, you used
aws s3 lsto confirm that the bucket was successfully created and listed under your account.
- After creating the bucket, you used
- Uploading Files and Folders:
- You tested file uploads by copying individual files to the bucket, and later expanded to uploading entire folders using:
aws s3 cp /path/to/folder s3://my-test-bucket-stasy-20241104/ --recursive - This allowed for bulk uploads, with the
--recursiveflag enabling the upload of all contents within the specified folder.
- You tested file uploads by copying individual files to the bucket, and later expanded to uploading entire folders using:
- Setting Up Access Controls (Optional):
- If needed, you could configure access policies for the S3 bucket by using the S3 Console to manage public or restricted access, ensuring that only authorized users or applications could interact with the stored files.
- Creating an S3 Bucket:
2. RDS Database for Data Storage
I set up an RDS instance for relational data storage, using MySQL as the database engine:
aws rds create-db-instance --db-instance-identifier mydbinstance \
--db-instance-class db.t3.micro --engine mysql --allocated-storage 20 \
--master-username admin --master-user-password mypassword --region ap-southeast-1
This instance handled all data storage needs for the project, with automated backups and secure access.
To confirm that this DataBase is already available, we run:
aws rds describe-db-instances --db-instance-identifier mydbinstance2 --region ap-southeast-1
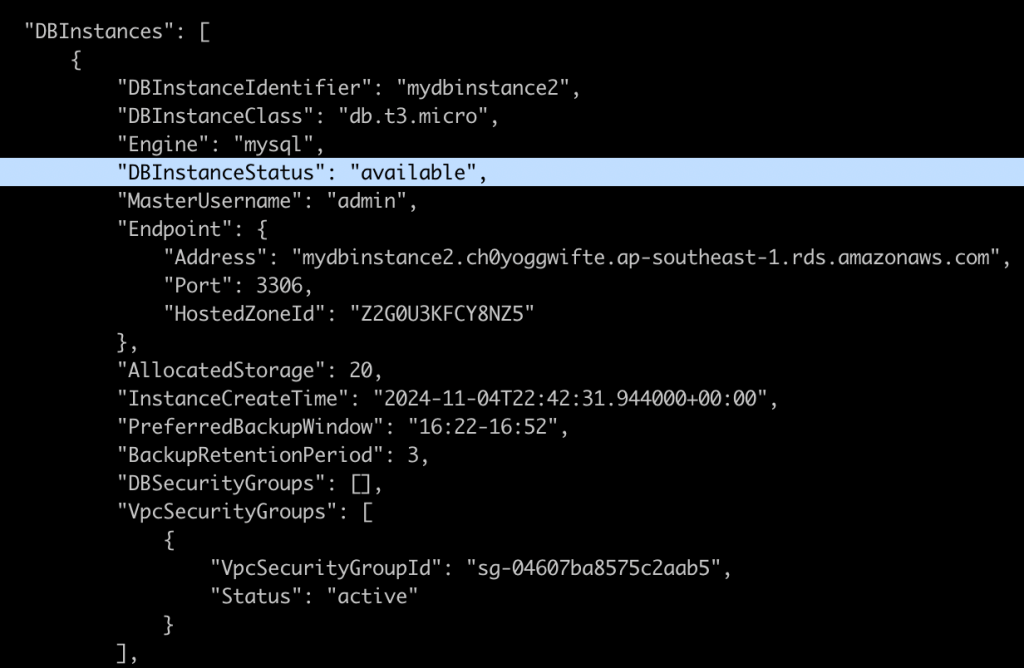
And if the output shows “available”, that means the database is good to go.
ps. Why is EC2 involved here?
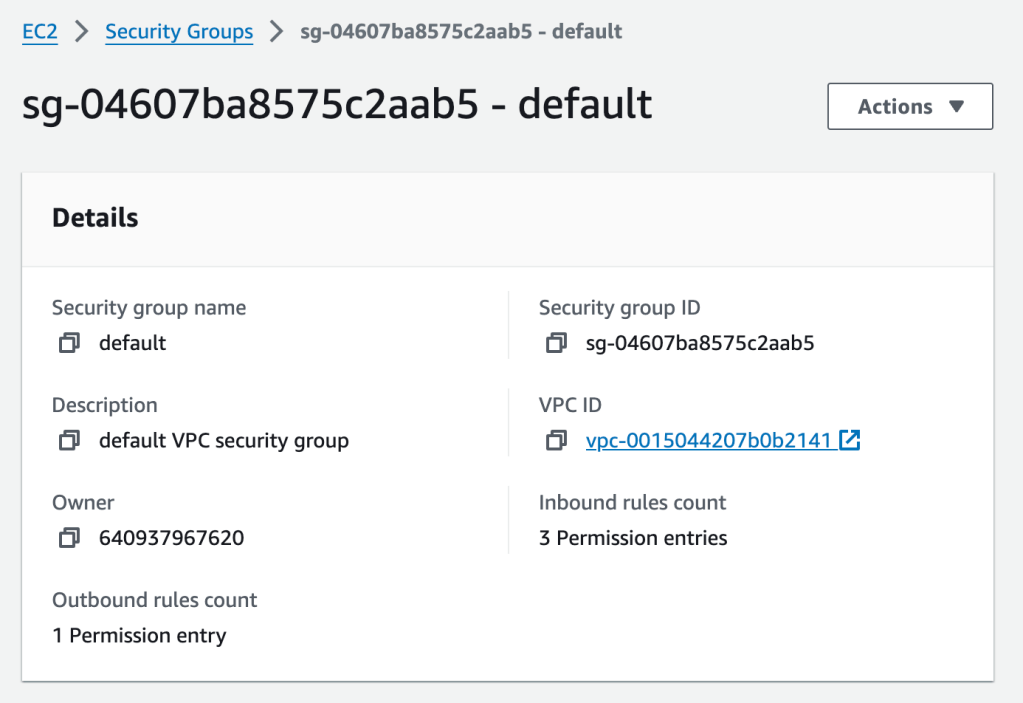
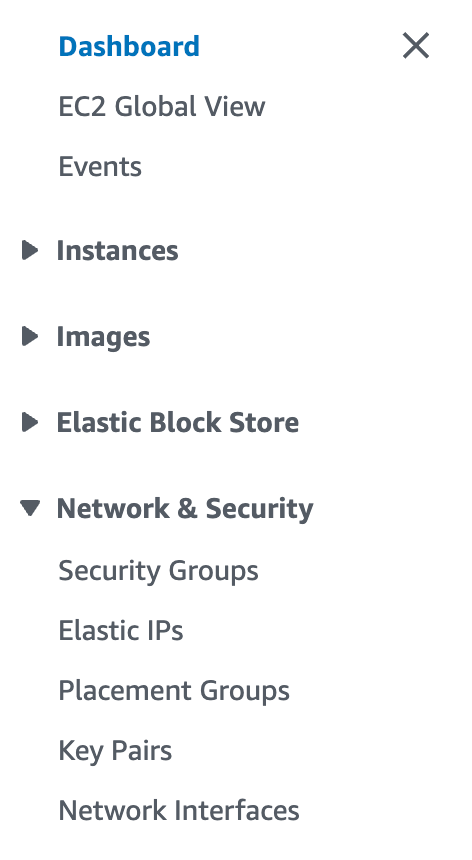
We go to the Security Groups section under the EC2 Dashboard, find the security group attached to our RDS instance, and modify its inbound rules.
Security Groups Are Managed Under EC2:
Security groups are a foundational part of AWS networking, and they control inbound and outbound traffic to resources.
All security groups, regardless of the services they are associated with (RDS, Lambda, EKS, etc.), are created and managed through the EC2 section in the AWS Console.
Using Security Groups for RDS and Other Services:
For example, our RDS instance needs a security group that allows access to the database on port 3306 (for MySQL).
To access EC2 in the AWS Console and set up security group rules for our RDS instance, follow these steps:
- Log in to the AWS Management Console:
- Go to AWS Management Console.
- Log in with your AWS credentials.
- Navigate to the EC2 Service:
- In the search bar at the top of the console, type EC2.
- Select EC2 from the dropdown list to go to the EC2 Dashboard.
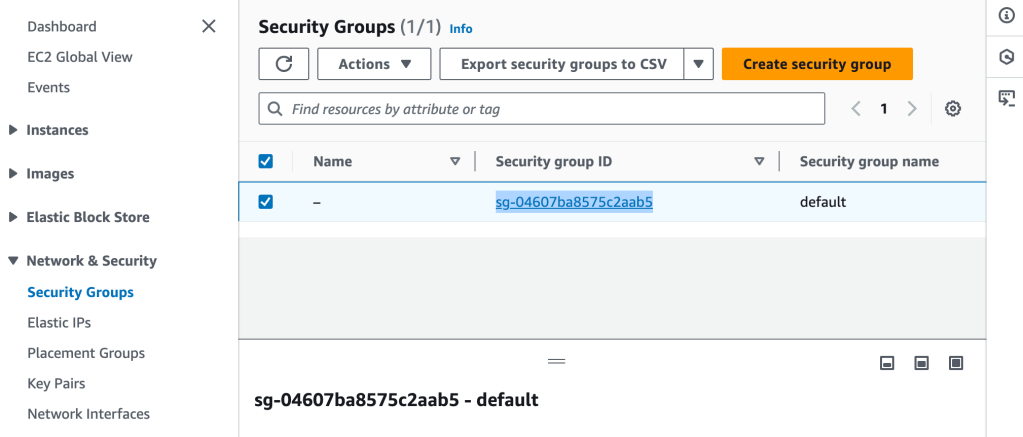
- Access Security Groups:
- In the EC2 Dashboard, look at the left-hand sidebar under the Network & Security section.
- Click on Security Groups to see a list of all security groups in your account.
- Find the Security Group Attached to our RDS Instance:
- Look for the security group associated with your RDS instance. If we don’t know the name, we can find it in the RDS Console under Databases > your RDS instance > Connectivity & security section.
- Edit Inbound Rules:
- Select the security group attached to our RDS instance, then click Edit inbound rules.
- Add a new inbound rule:
- Type: MySQL/Aurora
- Protocol: TCP (automatically filled in)
- Port Range: 3306 (automatically filled in)
- Source: Choose My IP to allow access from our current IP address, or choose Custom and specify a range if needed.
- Click Save rules to apply the changes.
- To check the endpoint of the DB, we run:

Connect to RDS and Set Up a Database:
Opened the terminal and used the MySQL client to connect:

mysql -h mydbinstance2.ch0yoggwifte.ap-southeast-1.rds.amazonaws.com -P 3306 -u admin -p
This is how we set up the RDS through EC2:
After the RDS is set up, we added some very simple test cases:
Created a new database called mydatabase:
CREATE DATABASE mydatabase;
USE mydatabase;
Adding a Sample Table:
CREATE TABLE users (
id INT AUTO_INCREMENT PRIMARY KEY,
username VARCHAR(100),
email VARCHAR(100),
created_at TIMESTAMP DEFAULT CURRENT_TIMESTAMP
);
Inserting Sample Data:
INSERT INTO users (username, email) VALUES ('alice', 'alice@example.com'), ('bob', 'bob@example.com');
Retrieving Data:
SELECT * FROM users;
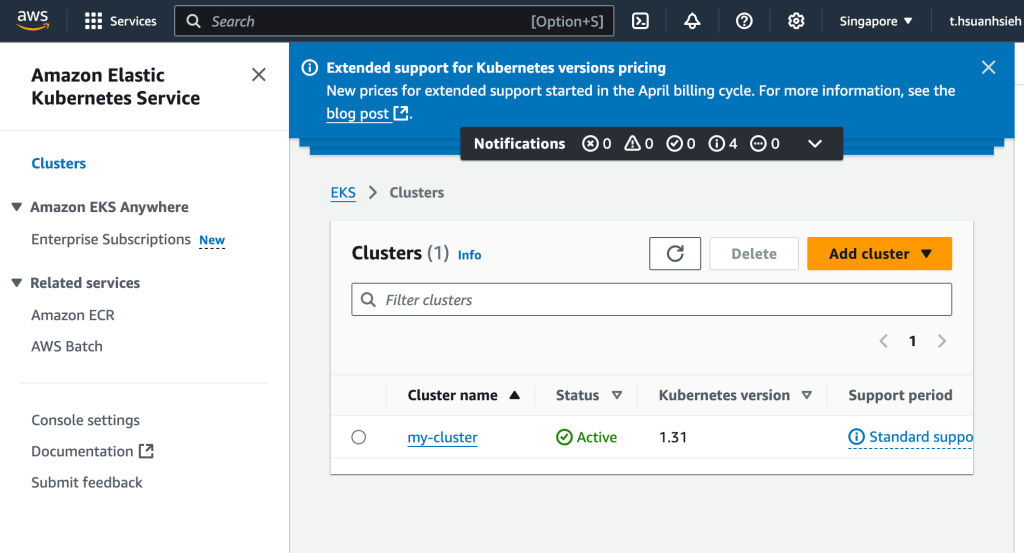
3. EKS Cluster for Application Deployment
Amazon Elastic Kubernetes Service (EKS) is a fully managed Kubernetes service that makes it easy to deploy, manage, and scale containerized applications using Kubernetes on AWS. Here’s a step-by-step guide to getting started with EKS:
Ensure that the RDS security group allows inbound access on the default MySQL port (3306). Go to EC2 > Security Groups in the AWS Console and update the inbound rules to allow access from your IP or VPC.
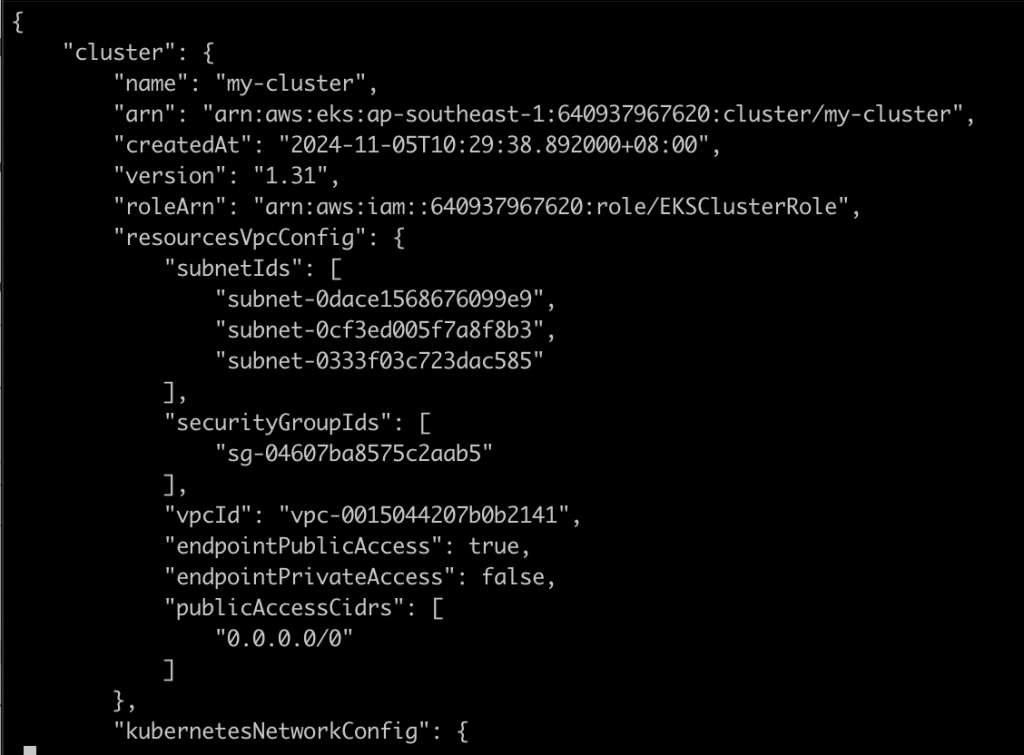
Next, I created an EKS cluster to deploy containerized applications with Kubernetes. I used kubectl to manage deployments and configured services to expose applications externally:
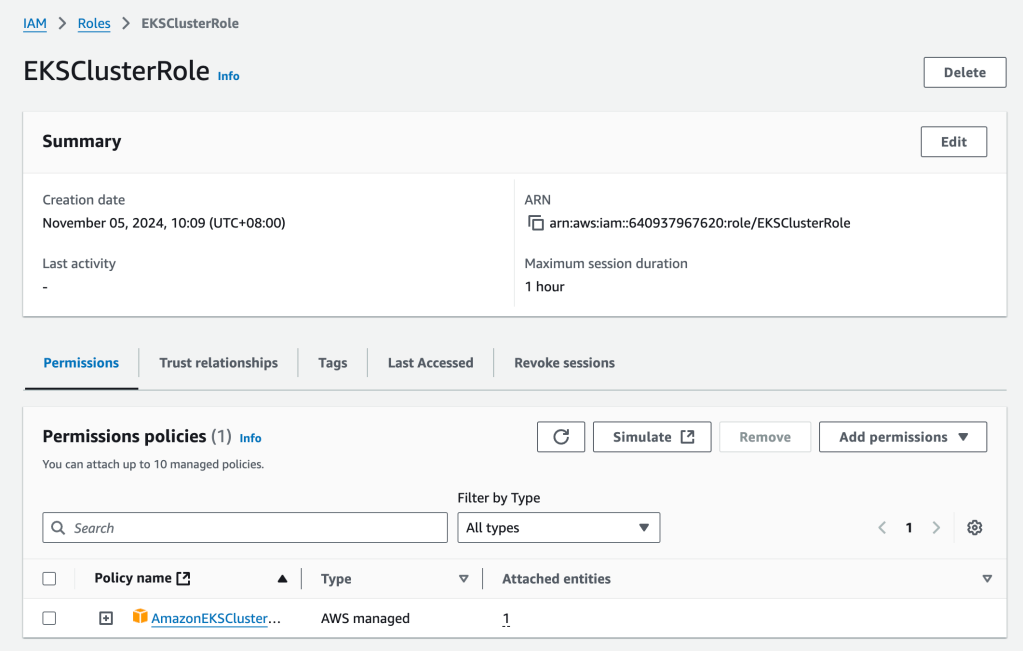

aws eks create-cluster --name my-cluster --region ap-southeast-1 \
--role-arn arn:aws:iam::640937967620:role/EKSClusterRole --resources-vpc-config subnetIds=subnet-12345,subnet-67890,securityGroupIds=sg-0123456789
This setup enabled scalable, high-availability application deployment.
- Setup and Configuration
- Create an EKS Cluster:
First, create an EKS cluster, which will serve as the foundation for deploying containerized applications. - Use the AWS Management Console or AWS CLI to set up the cluster:

Replace <your-region>, <your-EKS-role-ARN>, <subnet-ids>, and <security-group-ids> with appropriate values.
- Configure kubectl for EKS:
- kubectl is a command-line tool that allows you to interact with Kubernetes clusters. Configure kubectl to use your new EKS cluster:

2. Deploying Applications on EKS
Create a Deployment YAML:

Write a Kubernetes deployment YAML file to define how your application should be deployed on EKS. For example:
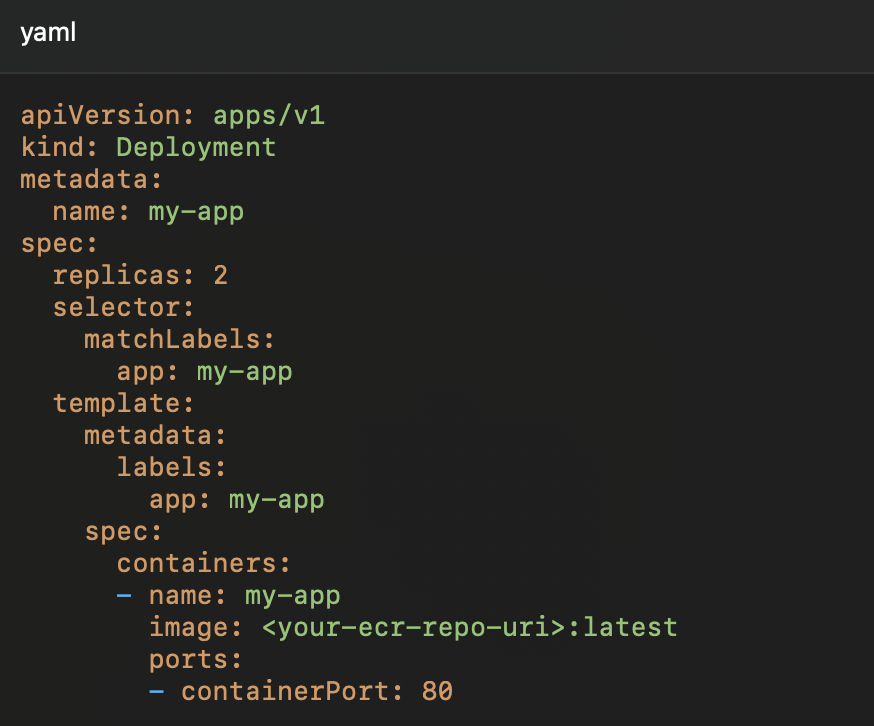
And then we apply the deployment with kubectl:

This command instructs Kubernetes to create the resources defined in our YAML file, deploying our application on EKS.
To make the application accessible externally, create a Kubernetes Service of type LoadBalancer:

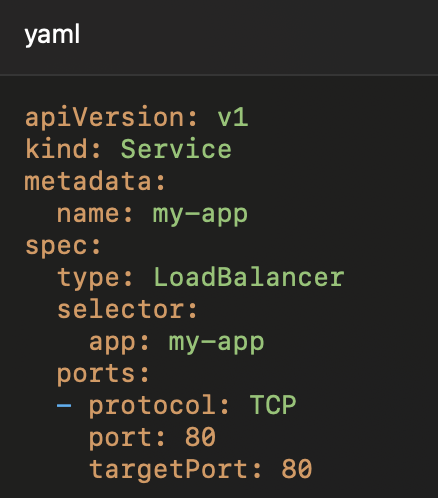
Apply the service configuration:

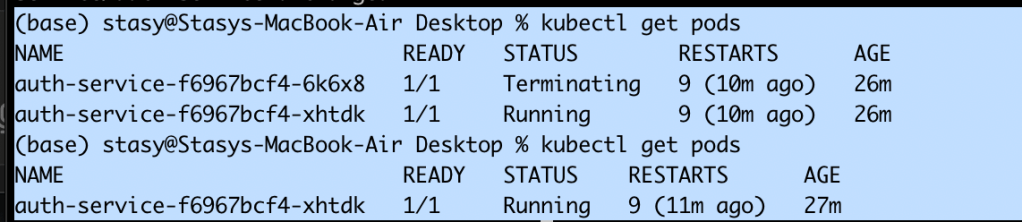
Check the status of the service to get the EXTERNAL-IP assigned by the load balancer:

To scale up or down, adjust the number of replicas in the deployment YAML and reapply, or use:

Enable autoscaling for dynamic scaling:kubectl autoscale deployment my-app --min=1 --max=5 --cpu-percent=70
To monitor our application, set up CloudWatch logging, or use Kubernetes-native tools like Prometheus and Grafana for deeper insights into performance and application health
AWS CLI: Efficient Setup and Resource Management
Install AWS CLI:
Download and install the AWS CLI on your machine. After installation, configure it with your AWS credentials:
aws configure: You’ll be prompted to enter your Access Key, Secret Access Key, region, and output format.
Using AWS CLI for ECR (Elastic Container Registry)
Authenticate Docker to push images to our ECR repository:
aws ecr get-login-password –region | docker login –username AWS –password-stdin.dkr.ecr..amazonaws.com
Push Docker Image to ECR:

After building your Docker image, tag and push it to ECR:
/docker build -t my-app .
docker tag my-app:latest .dkr.ecr..amazonaws.com/my-app:latest
docker push .dkr.ecr..amazonaws.com/my-app:latest
Using AWS CLI for EKS Cluster Management
Create an EKS Cluster:
Use AWS CLI to create an EKS cluster:
aws eks create-cluster --name my-cluster --region \
--role-arn --resources-vpc-config subnetIds=,securityGroupIds=
Update kubectl Configuration:
Once the cluster is created, update our kubectl configuration to access it:
aws eks update-kubeconfig --region --name my-cluster
Scaling the EKS Cluster with AWS CLI:
aws eks update-kubeconfig --region --name my-cluster
Scaling the EKS Cluster with AWS CLI:
To change the size of your node group or add additional node groups, use the update-nodegroup-config command:
aws eks update-nodegroup-config --cluster-name my-cluster \
--nodegroup-name --scaling-config minSize=1,maxSize=5,desiredSize=3
To remove the EKS cluster, use:
aws eks delete-cluster --name my-cluster
Delete the ECR repository when it’s no longer needed:
aws ecr delete-repository --repository-name my-app --region --force
Results and Final Output
Each service was successfully set up and configured. The S3 bucket provided organized storage, RDS securely managed relational data, and EKS facilitated the deployment of applications in a containerized environment. This project brought together key AWS services to create a functional, scalable portfolio.

Learning Outcomes
This project strengthened my skills in cloud infrastructure and automation. I gained hands-on experience in managing services, automating deployments, and troubleshooting. Future enhancements may include adding more automated monitoring and scaling policies for a more resilient setup.
